Tuesday, October 23, 2012

Cinnamon and Vanilla Bagels


My latest kitchen adventure is bread, and I was utterly thrilled with how these bagels turned out.  They have that good, hearty carb kick, (we are heading into Winter after all) but practically no fat and very little sugar.  I'll be honest with you - these bagels were so good I considered keeping the recipe a family secret to be passed from generation to generation, but I've never been one to keep a good thing to myself, so here you go...

Sunday, October 21, 2012

My Supplement Regime


Wow, it's been a while, huh? Things with work have been a bit crazy as I finally launched eSkills. It has been an emotional rollercoaster, but that's a topic for my work-related blog. What I have been pleasantly surprised at it how my health has stood up through this period of intense stress. I put this down largely to my supplement regime, which I have tweaked steadily for the past six months. It's one of the things that people ask me about most, so here is the breakdown of what I take and why.

Friday, March 9, 2012

March Update

Mystery bulbs are flourishing!
The toughest gardening challenge I have faced so far this year has been finding the patience to accept that this is a new, large garden and will inevitably take time to get established.  Part of this is waiting for plants to flourish, and part is waiting for my own familiarity with the garden to become useful.

Perhaps the biggest surprise over winter and early Spring was how poorly the garden performed. When I moved  in, I was over the moon with such a vast expanse of rich soil, well laid out beds and all protected by high brick walls.  A far cry from the sand, rocky, exposed garden I had before.  And yet my old garden defied the odds, becoming one of the most spectacular in the neighbourhood, with surprisingly little interference from me beyond planting and weeding.

Perhaps the problem is that I don't yet know what the problems are.

Pansies, cyclamen, primroses... all vanished. :(
There are several mysteries still shrouding the lack of growth and blooms this Spring, such as..

What is digging up and eating my bulbs?
What happened to my cyclamen??
Why didn't my crocus bulbs come up?
What ate my primroses and pansies?
Why did my azalea bloom in January??
Despite being rich soil, is it not draining when the water table is high?
What in the world are all those bulbs, sprouting leaves even when discarded on the suface?
Is the soil in the shaded bed too cold over winter to support even winter-hardy perennials?

I guess time will tell, but my oh my, finding patience to wait and see instead of whipping out the credit card on a mass plant buying spree is tough!

It wasn't all bad though; the irises that burst through were pure jewels.

Monday, March 5, 2012

DIY Plant Markers {Blog Love}

My little seedlings are almost ready for planting on, but sadly, I am at a loss as to the best place to plant them since my DIY plant markers made from old shampoo bottles ended up a blurry mess.  (The marker pen turned out to be simple felt tip, and no match for my eager watering!)  Here are some MUCH better ideas, courtesy of some of my favourite gardening blogs.


Hand paint some rocks. Especially ideal for me since I have a habit of picking up nice looking rocks on our walks.   Via http://whimsy-girl.blogspot.com/2008/07/rock-on.html


These are super simple! You can buy blank lollypop sticks in most craft shops... or just use the project as an excuse to slurp away on your favourite ice lolly in summer.  Via http://blog.imaginechildhood.com/imagine-childhood/2009/05/rainy-day-any-day-plant-markers.html


How cute are these?  A bit more labour intensive than other ideas, but lovely to get your child involved. Via http://lobstermonkey.typepad.com/my_weblog/2009/04/garden-markers.html


These are one of my favourites, however the orange juice containers that they used aren't that common in the UK.   (You can find the twist-and-pop dough containers in some bigger supermarkets.)  Via http://lobstermonkey.typepad.com/my_weblog/2009/04/garden-markers.html


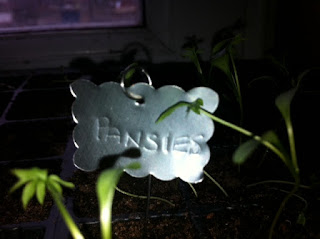
These aluminium markers were made with recycled drinks cans.  Yay!  I love my recycling.  I have some lovely pinking shears and paper die cut punches, so I think I can do something really pretty with this idea. Plus I like the fact there is no paint or pen involved, thereby cutting down on chemical use.  Via http://www.instructables.com/id/How-to-make-durable-plant-markers/


These lovely corks were shared from Shine Your Light Blog

Got an idea I missed?  Share in the comments. :)

Monday, February 13, 2012

Indoor Garden

I was all excited last week to get my seeds and bulbs out.  Sadly, that excitement has now faded since all I have to look at is bare earth which seems an impossibly long way off from the garden plan I made.

Yesterday, with little else to be done, I couldn't resist playing with some garden related crafts.

Each season I collect various bits and bobs from our walks...shells, pebbles, twigs and leaves all end up in a big box near my craft desk and I vow to turn them into artistic masterpieces at the soonest opportunity.  Of course, most of them tend to linger there for months before I get around to doing anything with them, so I was pleased with myself for actually finishing not a project this weekend.

These frames are for a large blank wall in the living room.  I had originally wanted to make a living wall garden, with moss and airplants, but the moss I found was pretty ugly and I couldn't seem to find any airplants that weren't already glued into hideous cliches of stumpy logs.

I'd still love to do something like this...


In the meantime though,  I found these three frames at a charity shop ages ago for 50p each.  They came with hideously twee little wooden bunnies and tulips fastened to the inside, but the top of the frames are tealight holders so I thought it was worth picking them up to see if I could strip them back to a more minimal and stylish version.


The twigs are ones that I gathered last November, but they have stayed bendy.  They were from something that looked like a shrub, and I'm not sure what they are.  I love the little buds.

I cut up some astro turf from a sample square metre that I bought and laid it on the bottom of the frame, then just bent the twigs into shape.  They still looked a bit bare so I added two twig balls that I had from a set.

The whole thing is held in place by tension,  so it will be easy to change it any time I want.


When it came to the white frame, which will hang in the centre of the two green ones, I wanted to do something different.

These greenish white roses are from a bunch I bought online.  They were the cause of my biggest case of buyers remorse ever, since they looked like beautiful silk roses online and turned out to be cheap tat that I could probably have got in the pound shop.  Glad they are finally proving useful for something!


Now I can enjoy a little bit of garden indoors, coupled with candlelight just in time for Valentine's day.

Monday, February 6, 2012

And so it begins...

After the mess that was my home office last Spring I decided to invest in some proper seed propagation trays this year in order to keep my house looking a little less like a crazy person had taken over.

Quite a difference!


All of the precise little pockets are filled with John Innes seedling compost, and each is just waiting for me to plant a little seed into it tomorrow.

I was also astounded by the resilliance of nature when I stumbled across three wrinkled Hyacinth bulbs, which despite having been lingering at the bottom of a soilless pot for over 12 months in my shed are not only sprouting but boasting flower buds.  Needless to say they have been rescued and tucked in to a pot of compost, watered and given pride of place on my dining room table.  I wonder if they will flourish, or reel back into hibernation from the shock of such lavish attention following their cruel neglect?

Monday, January 30, 2012

New Garden, New Year!

While 2012 may have started for most people on 1st January, and for the Chinese on 23rd January, it is 1st of February that is my traditional day to celebrate a new gardening year.  The garden might still be cold and barren, but there is whole flurry of activity happening out of sight... in the roots stretching out, in the branches about to bud and in my shed, and in the bulbs tucked warm underground and pushing their way impatiently towards daylight.

My first task for the new year is shopping.  Perusing catalogues, magazines and books to find inspiration for the direction that the garden could take this year, and deciding on a plan of action.  What to plant, where to plant and when to plant.   I buy all the seeds I will need for the year, and then indulge my impatience with a few larger bare root purchases that will kickstart the process while my little seedlings are growing.

2012 will be my first full year in this new garden, and it took me several months to come to grips with the daunting prospect of transforming a much larger space than I have ever owned.  My first phase of planting, done in October after I moved in, was largely undone with the severe storms, wind and rains of winter.  The beds sit largely empty, which at least will mean a fresh start for my spring and summer planting and has probably in a way been a blessing in disguise, as a blank canvas seems easier to work with than negotiating around inherited shrubs and straggling perennials.

2012 Garden Plan

In general, the garden is a huge expanse of lawn with large beds at the right, a small irregularly shaped raise bed on the left, a raise bed by the house and a patch beside the gate where a large pampass grass has staked a claim that it is unlikely to ever share politely with any other neighbours I try to introduce.

I'd love to do something creative with a central bed or even a fountain in the middle of the lawn, but since I am only a caretaker and not owner of this garden, and it is used in the summer for drying clothes, I will have to settle for flexing my green muscles in the other areas.

My plan is to install a large pot with a solar water feature in the raised bed at the back and surround it with leafy hostas, lilies and irises.  A dierama or two will add height and movement and tie in with the Pampass Grass on the other side.

Speaking on that dramatic, stubborn plant,  I hope to add a bit of colour and interest around it with Chinese lanterns and other, more compact coloured grasses.

The large bed, I am planting mostly cottage garden favourites.  Plenty of perennials to add colour from March through October, with enough hardy evergreen foliage to stop the garden from looking like it has totally died off in the winter.  I am investing in a cherry and hawthorn to round out the structure of the garden and add some colour after most of the flowering bedding has died off.

Lastly, the raised bed at the door will have a herb garden on one side, with a few rows of veggies on the other side.  A bushy strip of lavender will separate the two halves.

A lot of work, but hopefully well worth the effort!